Build a minimal HTTP server with Node
Posted on • tagged with node javascript
To create a Node.js application, you need a web server, a request, a router, and request handlers. Frameworks like Express.js speed up development by providing a robust set of features to build web applications and APIs.
Developing applications with Node.js doesn't have to be intimidating. Sure, large apps will have much greater complexity than a simple API but the underlying logic of how they work won't change much. You need a web server to allow web clients to send requests, a view or page to display the servers response, a router to route specific requests, and lastly request handlers to handle requests sent to the server which have been routed by the router.
What is a Node.js app?
The first thing you need to implement in a Node.js application, is a server. The web server will allow users to make requests. The HTTP protocol is used for handling transmission of data on the Web (ie client/server model). This means that information exchange between the client and server is half-duplex. Since the HTTP protocol is half-duplex, it can only allow one way information exchange. For example, if a web client makes a request to the server, the server cannot send back a response until that request is received and "completed". Below is a small example of how information is sent using the HTTP protocol.
             (Request)
|--------| ------------> |--------|
| Client |               | Server |
|--------| <------------ |--------|
             (Response)
Setup a basic server using the HTTP module
Creating a basic HTTP server only takes a few steps. Require the HTTP module and then call the createServer function on the HTTP module to create the server. This function returns a Server object which has a method called listen that allows us to specify the port which the server should listen to requests on.
The createServer function takes one argument, an anonymous or "named" function that handles requests and responses. This callback function allows us to utilize the asynchronous event driven model in Node by handling requests when they arrive and continue executing other code when waiting for a request in a non-blocking fashion.
Why use callbacks? Well, we don't want the web server to be started and then pause or stop executing in between requests. When multiple requests come, we also don't want the server to wait to execute the second request until the first is complete in a blocking way. The idea of the callback function helps us to avoid these synchronous and blocking scenarios and really utilize the async event driven paradigm in Node.
const http = require('http');
const port = process.env.PORT || 8000;

http.createServer((req, res) => {
    res.writeHead(200, { "Content-Type": "text/plain" });
    res.write("Hello, world!");
    res.end();
}).listen(port, () => {
    console.log(`App is running on port ${port}`);
});
The above code will create an HTTP server listening on port 8000 and define the response for any incoming requests. The req object has a property url that holds the request URL value, e.g. a request on http://localhost:8000 would have a req.url = "/". The writeHead method on the response object defines an HTTP status code and headers for a response.
Next, we send some HTML in the response and finally end the response with res.end(). Since we haven't defined a router, all requests on http://localhost:8000/* will be handled the same way and send the text/plain response:
Hello, world!You can verify the response is being received on the client by checking if the response data is on the webpage, or by going into Developer tools and looking at the "Network" tab to make sure the "Preview" or "Response" tab holds the expected response payload.
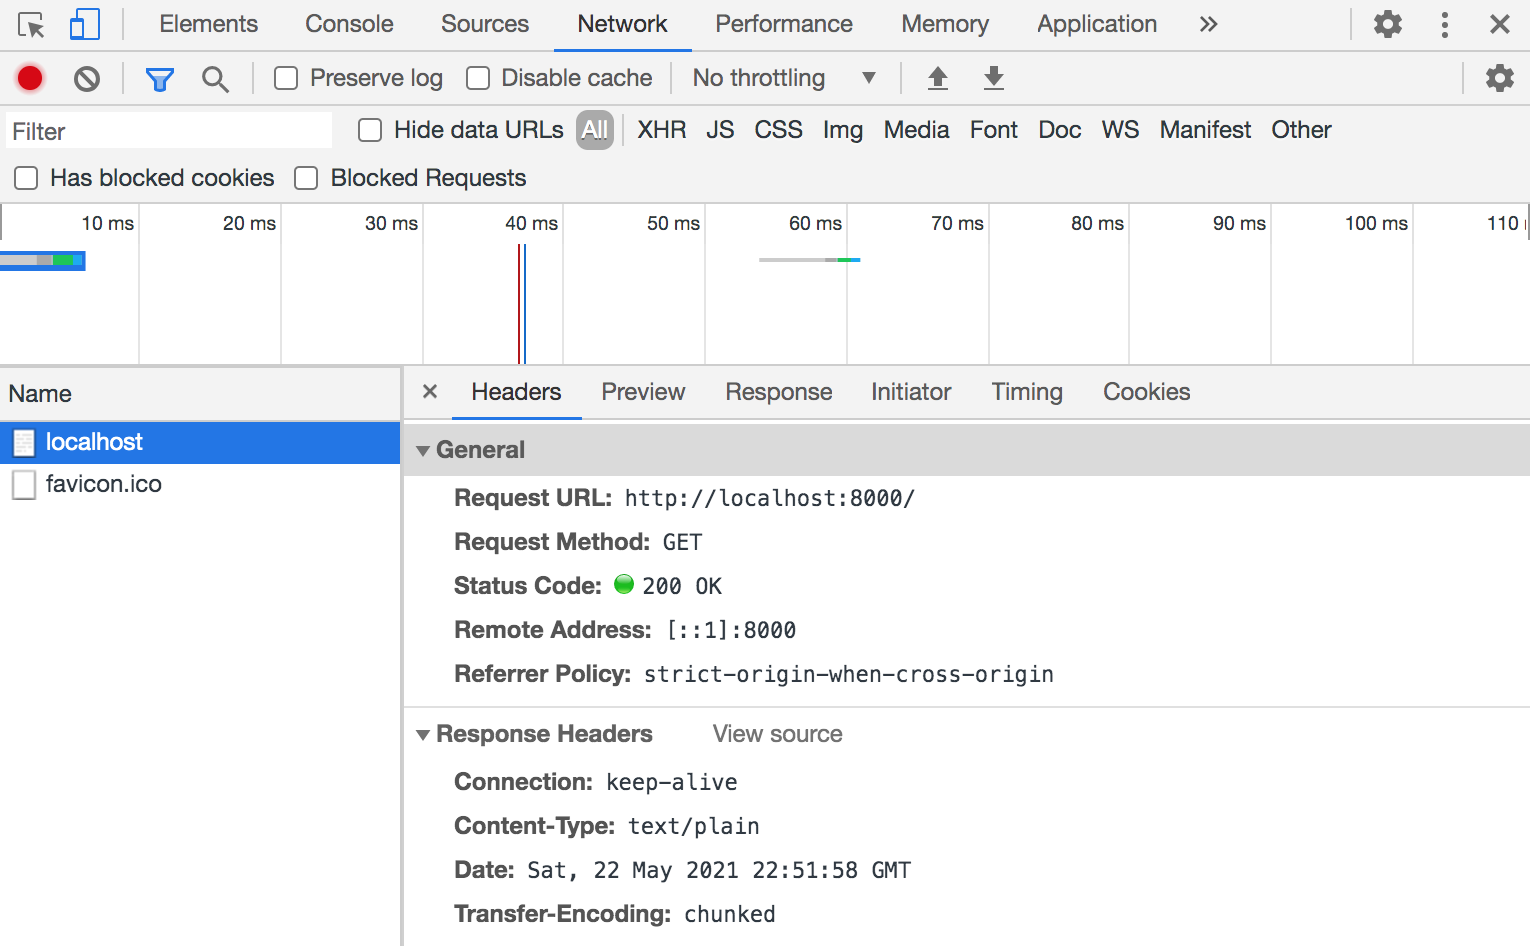
Having a look at the "Headers" tab, we can see an HTTP GET request is being made to http://localhost:8000. The request was sent and processed successfully by the server and returned an HTTP response status code 200 (OK). The Content-Type header we specified for the response with res.writeHead() is correctly shown as text/plain. If you can't see the string "Hello, world!" on your webpage, then navigate to the Network tab or look for an error being thrown.

Displaying the Response
Instead of sending plain text to the root URL (http://localhost:8000) ie the / endpoint, let's send static HTML in the response. For testing and local development, its fine to create a template literal string containing the HTML you want to send. That can be accomplished like this:
const http = require("http");
const port = process.env.PORT || 8000;
const html = `<header><h1>Hello, World!</h1></header>`;

http.createServer(function(req, res) {
  res.writeHead(200, { 'Content-Type': 'text/html' });
  res.write(html);
  res.end();
}).listen(port, () => {
  console.log(`App running on port ${port}`);
});
The expected response would be the HTML contained in the template literal html. Although this is a quick way to serve some HTML. The recommended way of serving static files is by reading the file contents and then sending that data in the response ie serving it. Using the fs file system module, we can quickly read the contents of a HTML file index.html and send it wherever. There are many ways to read a files contents. Node docs recommend the async fs.readFile() method, but a ReadableStream would also work. Below is an example of serving a static HTML file at the root URL of our basic HTTP server:
const http = require("http");
const fs = require("fs");
const port = process.env.PORT || 8000;

http.createServer(function(req, res) {
  console.log(`Request received for '${req.url}'`);
  fs.readFile(__dirname + "/index.html", function(err, data) {
    if (err) {
      res.writeHead(404);
      res.end(JSON.stringify(err));
      return;
    }
    res.writeHead(200, {'Content-Type': 'text/html'});
    res.end(data);
  })
}).listen(port, () => console.log(`Listening on port ${port}`));
The above example will serve a file called index.html from the current directory. If you haven't used __dirname before, it is an environment variable that tells you the absolute path of the directory containing the currently executing file.
The docs use res.end() to send data in the response body, but using res.send(data) or res.write(data) followed by res.end() would accomplish the same goal. The .send() method will send the HTTP response and looks like .send([body]), where the body parameter can be a Buffer object, a String, an object, or an Array. The .end() method will end the response process.
Note: Read more about the difference between res.end() and res.send() on StackOverflow
<!DOCTYPE html>
<html lang="en">
<head>
<meta charset="UTF-8">
<meta name="viewport" content="width=device-width, initial-scale=1.0">
<meta http-equiv="X-UA-Compatible" content="ie=edge">
<title>Home page</title>
</head>
<body>
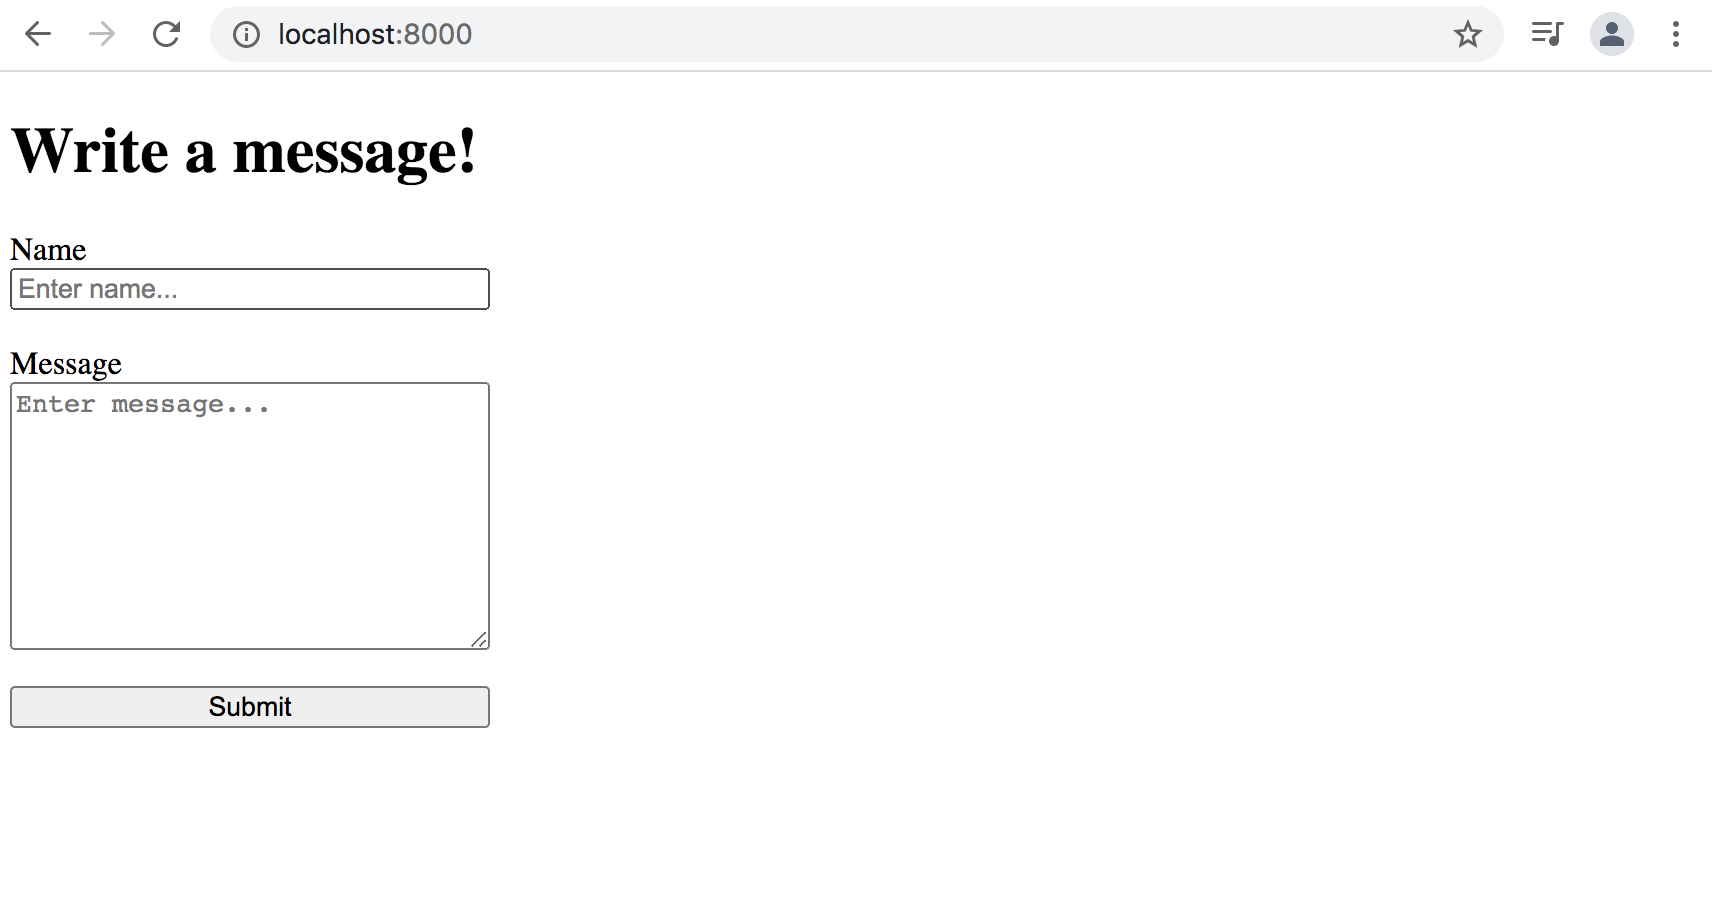
<h1>Write a message!</h1>
<form action="/message" method="POST" style="display: flex; flex-direction: column; max-width: 30ch;">
<label for="name">Name</label>
<input type="text" name="name" id="name" placeholder="Enter name..."><br>
<label for="message">Message</label>
<textarea name="message" id="message" rows="40" cols="10" style="resize: vertical; height: 8rem;" placeholder="Enter message..."></textarea><br>
<button type="submit">Submit</button>
</form>
</body>
</html>When you make a request to the / route on the HTTP server we have created, you will be served the HTML page above as the response. Since we haven't setup any routing, every route requested on the server will be returning the same response. That means if I make a request to the /blog route, the response will be the same since there isn't a router in place to route requests to a specific handler.
Create Request Handlers
All of this articles code could be written in a single JavaScript file but to keep things organized, reusable and readable. We will be separating the functionality into modules and requiring them in the entrypoint to our application app.js. There will be two API endpoints in this article:
- The home page:
/ - The message submitted by form:
/message
To start writing the request handlers, create a file called handlers.js in your root directory. We will define two functions, home and message to handle the request for each respective route and send back a response. The home page serves a static file index.html and the /message page will display JSON with the form submission contents. Also, define a route handler object handlerObj with properties which match the available routes. Each route is a property in the object and will store its corresponding request handler function. Lastly, make the file a module by using module.exports to export the object and handler functions.
const handlerObj = {
  "/": home,
  "/message": message
};

function home(res) {
  console.log("Executing 'home' handler");
  fs.readFile(__dirname + "/index.html", function(err, data) {
    if (err) {
      res.writeHead(404);
      res.end(JSON.stringify(err));
      return;
    }
    res.writeHead(200, {'Content-Type': 'text/html'});
    res.end(data);
  })
}

function message(res, payload) {
  console.log("Executing 'message' handler");
  let query = new URLSearchParams(payload);
  let data = {
    name: query.get("name"),
    message: query.get("message")
  };
  res.writeHead(200, {'Content-Type': 'application/json'});
  res.write(JSON.stringify(data));
  res.end():
}

module.exports = {
  handlerObj,
  home,
  message
}
The home function is the same implementation for reading a files contents and serving it as shown in displaying the response. The message function represents an endpoint that receives a POST request from the home pages form submission and displays the form submission on /message. The form elements action attribute equals /message which means the form is submitted, the page is redirected to http://localhost:8000/message.
When the form is submitted, the query string representing the form data is sent to the server as the post body. This is what's stored inside payload, the second argument to the message function. There are many ways to parse a query string, you could use the npm package querystring or something already available to us for working with a query string of a URL like the URLSearchParams interface.
I chose to use the Web API URLSearchParams to keep things in-house. Using the constuctor new URLSearchParams(), we create a new instance of the interface and pass in the query string received by the server when our "Write a message" form is submitted. Now the URLSearchParams interface is available so we can use URLSearchParams.get() to grab the values from the query string. Lastly, send an object with the name and message in response.
How does the Router work?
Up until now, the Node application is listening for requests on port 8000 and serving a static HTML file as the response to all requests. Since we have a functional server that is processing requests and returning a response. It is time to add some routing.
The routers main job is to 'route' requests to a specific handler which then will send a response. To better understand what exactly a router will do, have a look at the following makeshift router example:
const http = require("http");
const port = process.env.PORT || 8000;

http.createServer((req, res) => {
  if (req.url == '/blog') {
    res.writeHead(200, { 'Content-Type': 'text/html' });
    res.write("<h1>My Blog</h1>");
    res.end();
  } else {
    res.writeHead(200, { 'Content-Type': 'text/plain' });
    res.write("Hello, world!");
    res.end();
  }
}).listen(port, () => console.log(`Listening on port ${port}`));
If a request is made to the /blog route, then we will return an HTML response with a heading element. Otherwise, for any other route on the server that isn't /blog, we will send the Hello, world! plain text response. This is a really basic example of what exactly the router will be doing. It 'routes' requests to a specific handler so the API endpoints like /blog or /messages return the appropriate response.
Setup a Router
To setup a router, first create a file named router.js. For this article, imagine that all files are at the root directory of the project. So far, we have the server.js file which holds our HTTP server code and the newly created router file. The router will be a function named route that we will export and use in our server code.
function failed(path, res) {
  res.writeHead(404);
  res.end(`No handler found for '${path}'`);
}

function route(path, res, handlerObj, payload) {
  console.log(`Routing request for '${path}'`);
  let routeFound = typeof handlerObj[path] == 'function' && handlerObj.hasOwnProperty(path);

  return routeFound ? handlerObj[path](res, payload) : failed(path, res);
}

module.exports = route;
The route function simply checks to see if the given path is a property of the handlerObj object and if the type of that property is indeed a function. Also performing a check to see if the handlerObj has a property with the given route in path. If routeFound is true then execute the request handler function for that given path, otherwise send an error message with a 404 status.
Updating the Server code
Let's refactor the server.js code a bit so we can export a startServer function to be used in app.js. In the process, placing all of the current http.createServer code into a start server function and giving it two arguments. One for the router and another for the handler object which will come from our entrypoint. The first argument to .createServer() is a callback function so we will break that out into its own named function for the heck of it.
const http = require("http");
const port = process.env.PORT || 8000;

function startServer(route, handlerObj) {
  function handleReq(req, res) {
    const path = req.url;
    let payload = "";

    req.on("data", (chunk) => {
      payload += chunk;
    });

    req.on("end", () => {
      route(path, res, handlerObj, payload);
    });
  }
  http.createServer(handleReq).listen(port, () => console.log(`App running on port ${port}`));
}

module.exports = startServer;
Not a whole lot changes in the server code, except for the addition of a startServer function and a named function handleReq. Aside from the new functions and organization, we begin listening for data events on the req object and assign the value of that POST data to a variable payload which is passed to the router.
Setup an Entrypoint
The entrypoint for the application, ie where the HTTP server is started will be app.js. The filename isn't important, but understanding this is the script that starts the server is. Up until this point we would run our node app with node server.js but with the entrypoint becoming app.js, the command for starting up the server would be node app.js.
It's time to require all of the modules we have created so far:
const startServer = require("./server");
const router = require("./router");
const { handlerObj } = require("./handlers");

startServer(router, handlerObj);
This is one of the reasons modules are so great. We can abstract away all of the nitty gritty implementation of our server into separate modules. This keeps things organized and reusable, instead of putting all of the code into a single file which would quickly become unmaintainable.
When we run node app.js the startServer function will execute and our HTTP server will begin listening for requests on the specified port.
Listening on port 8000
Request received for '/'
Routing request for '/'
Executing 'home' handler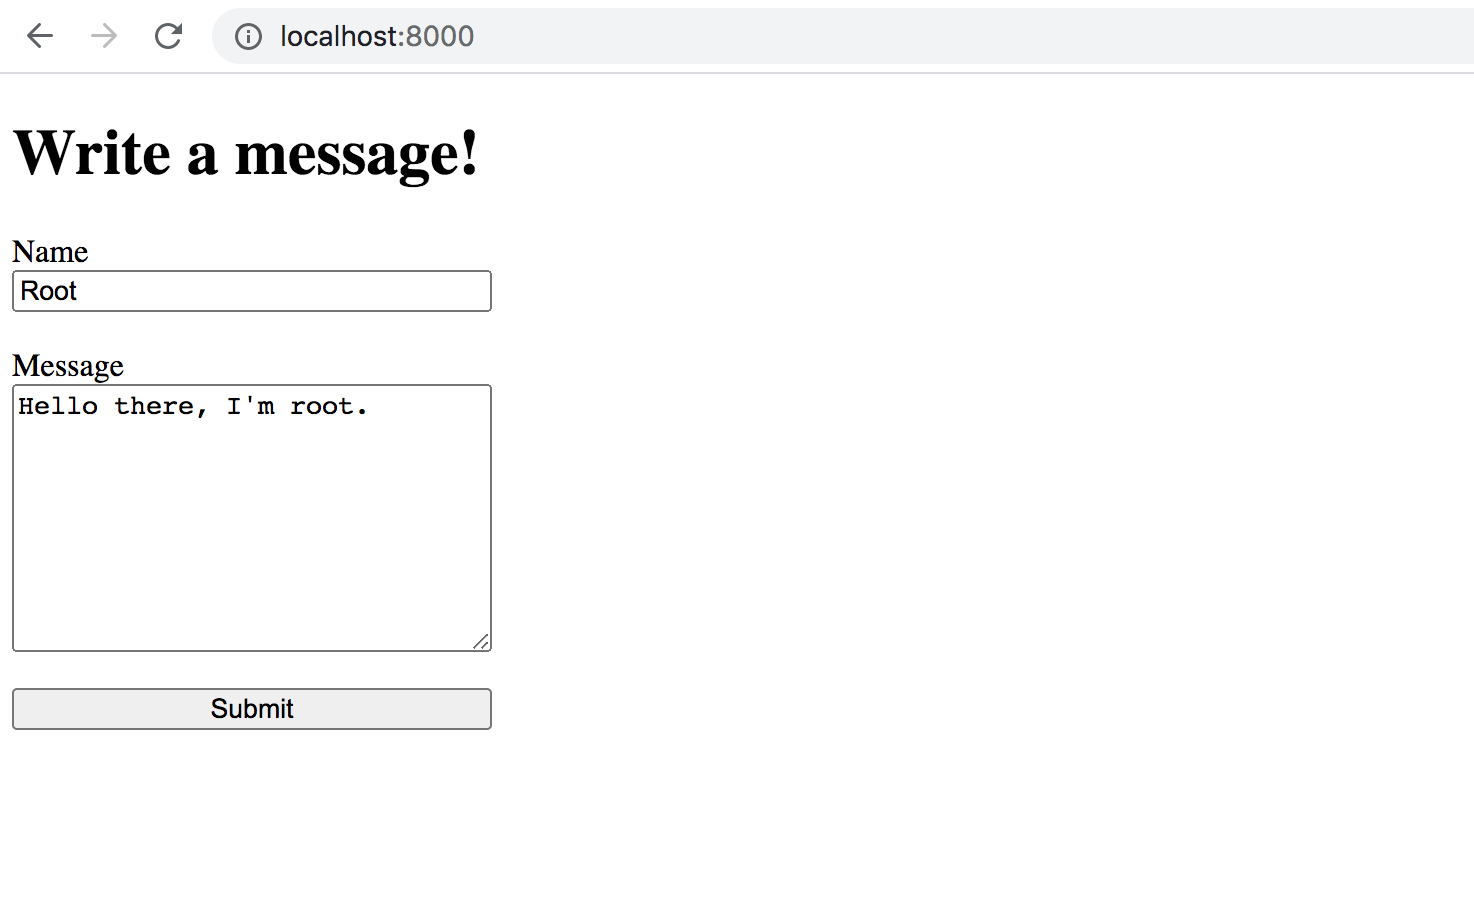
After hitting the submit button, we are redirected to the /message route and the data from the form submission is sent to the server in a POST request. Have a look at the Network tab in Developer Tools to verify the response.
Request received for '/message'
Routing request for '/message'
Executing 'message' handler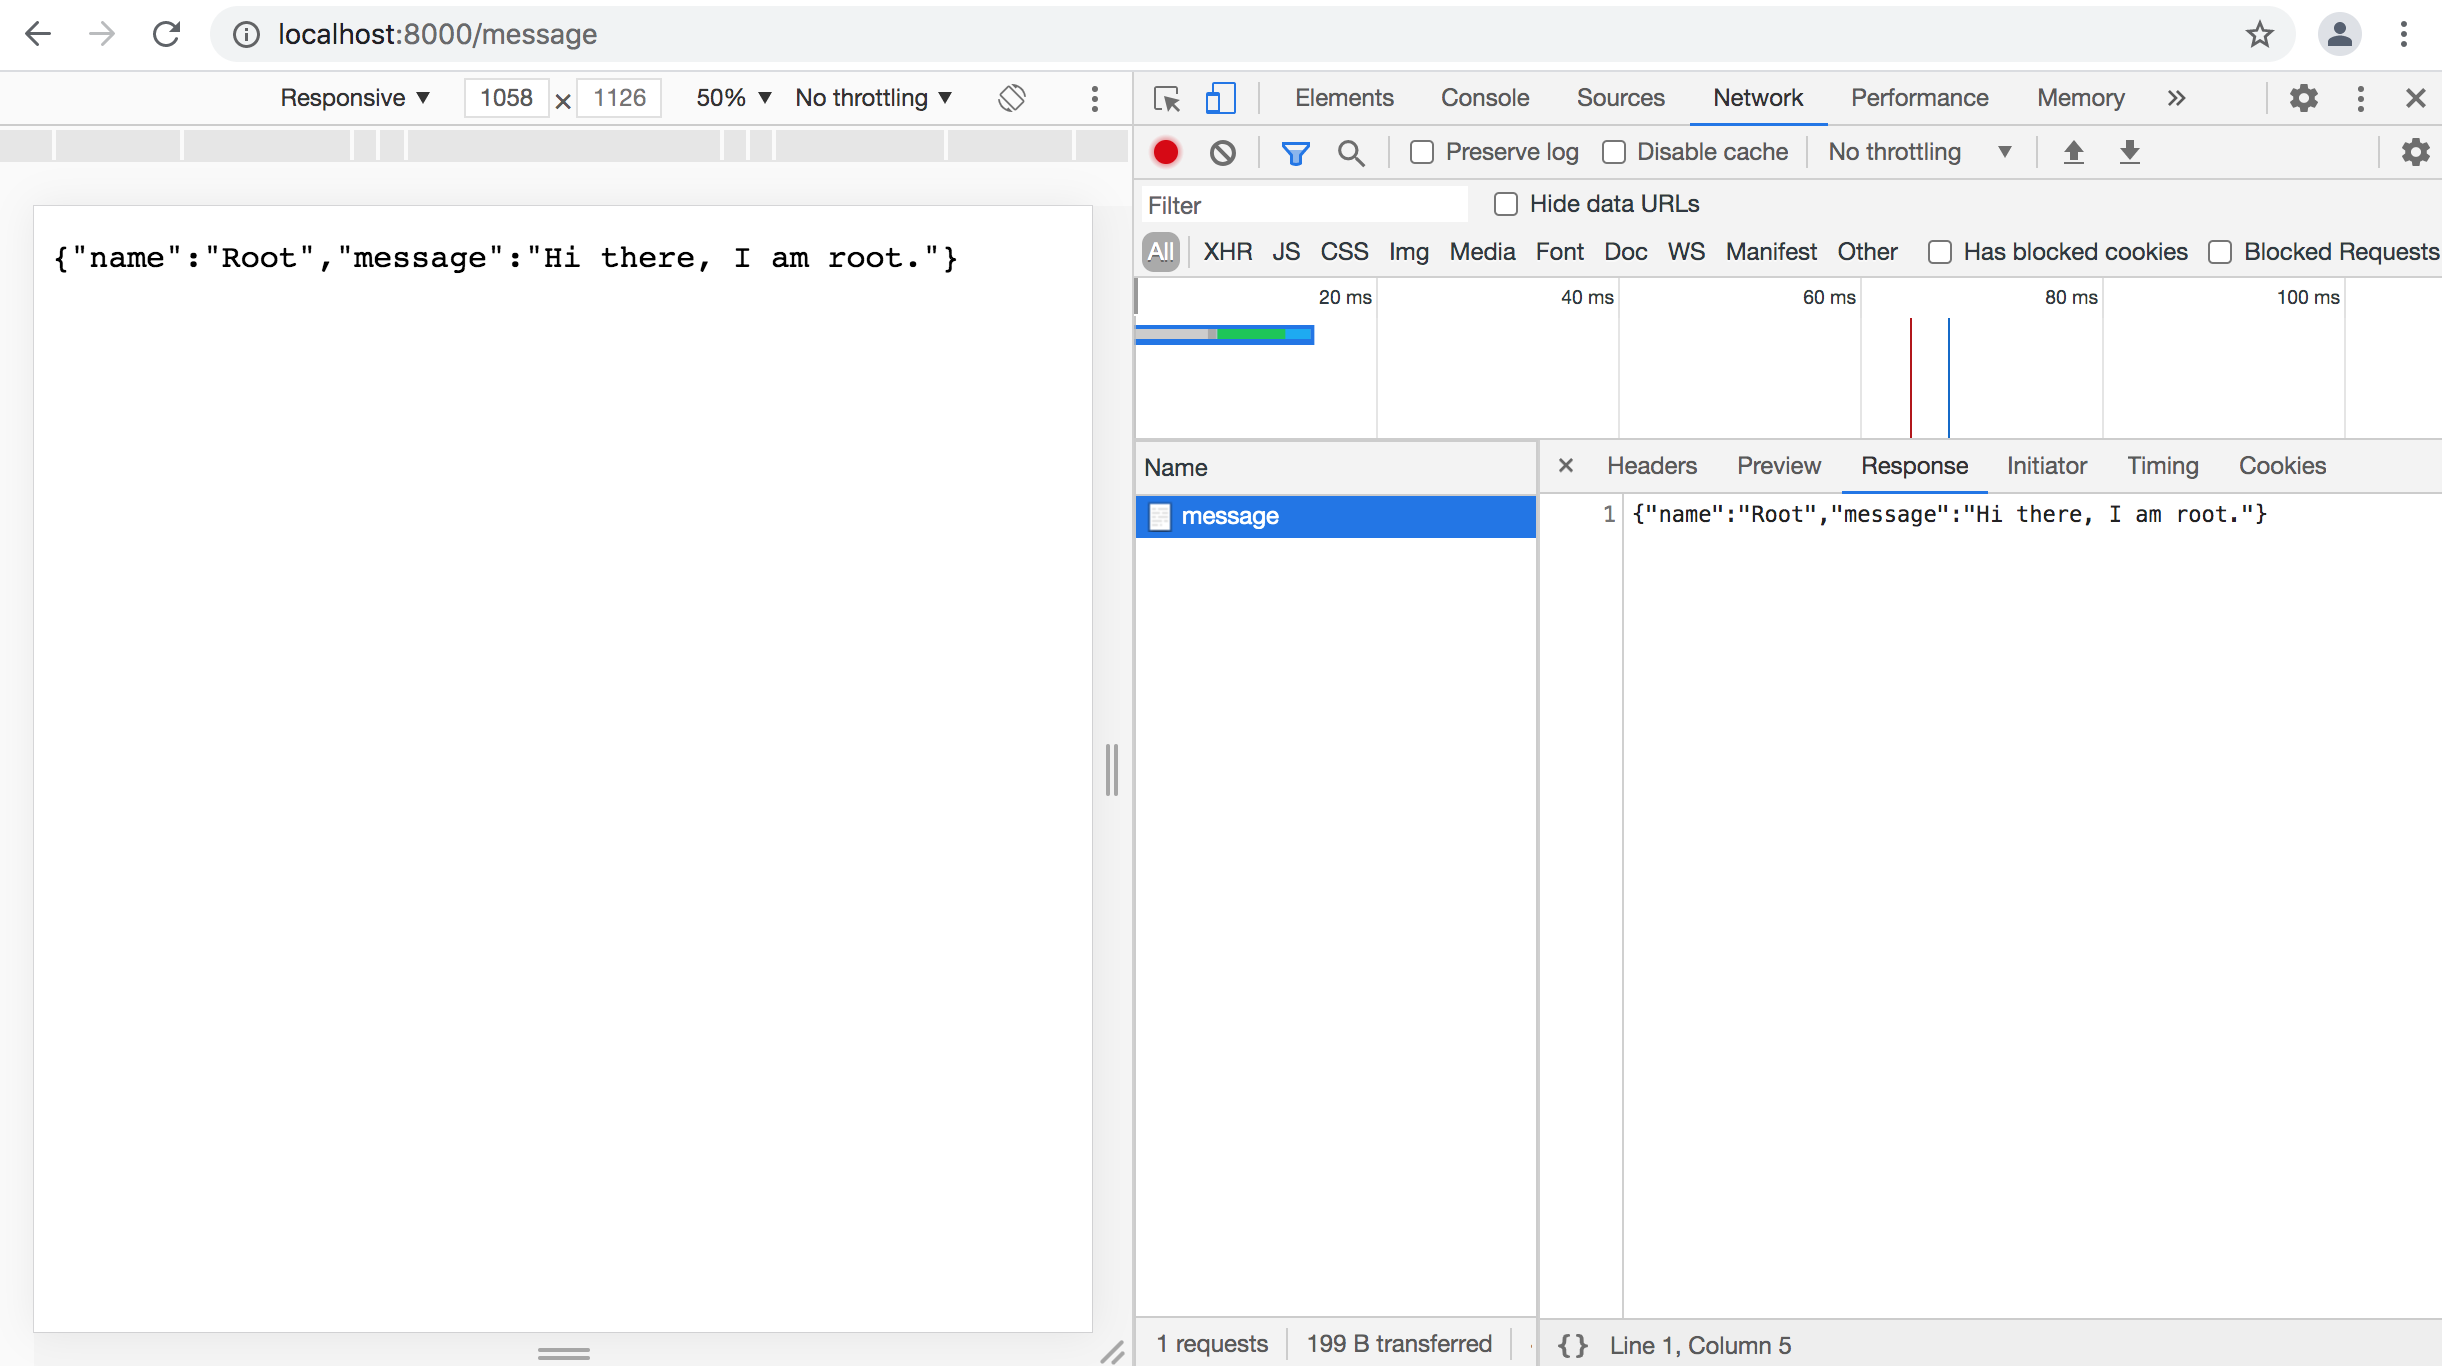
If you read this far, you should have a solid understanding of setting up a basic HTTP server with Node.js. Now go forth and build cool stuff with Node! You can view the source code for this demo over on GitHub. Oh ya, don't forget to go give Express.js a try!